
Introduction
This is a tutorial for developing a Ball Game in Android OS. It will introduce you to developing Android games using AndEngine (free Android 2D open source game engine). To understand this tutorial, you will need to have some basic knowledge about AndEngine and programming in Java. If you don't have knowledge about AndEngine, you should check this link. The goal of this tutorial is to teach you how to make your own Android game.
The Game
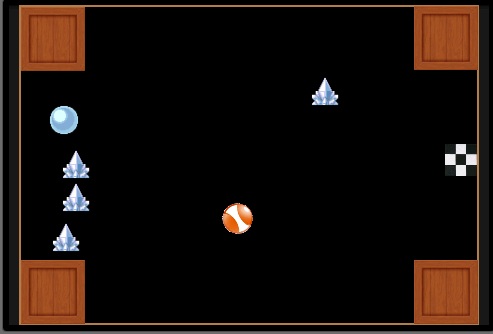
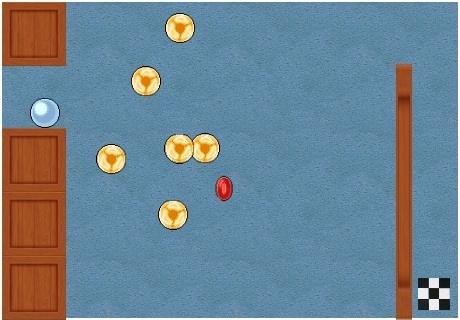
It's a classic game idea implemented in a modern way. You control the ball using the accelerometer sensor and your goal is to collect all "diamonds", avoid enemy balls and to come safely to the end.


What You Need to Start?
To start developing your own Android games, you need SDK and game engine (it will make your life way easier!). I used Eclipse SDK and game engine called AndEngine. Are you wondering how to setup Eclipse SDK and AndEngine together? Click on the link to see "Getting started with AndEngine" tutorial.
Let's Do Some Coding!
Let's see what is hiding in the code! Please note that I didn't paste the full source code here. I just pasted some snippets. You can download the full project to see the complete source code.
First, we will take a short tour in the
main class.public class GameLogicController extends BaseGameActivity
implements IAccelerometerListener{
public PlayerProfileManager playerProfileManager;
public LevelController levelController;
private Camera camera;
protected PhysicsWorld mPhysicsWorld;
public Texture mTexture;
public TextureRegion enemyTextureRegion;
private float mGravityX;
private float mGravityY;
private final Vector2 mTempVector = new Vector2();
public TiledTextureRegion mCircleFaceTextureRegion;
private RepeatingSpriteBackground mGrassBackground;
private Sound mGameOverSound;
...
}
GameLogicController is the base class in our game, BaseGameActivity is the base class in AndEngine andIAccelerometerListener is the interface used to get data from your mobile phone accelerometer sensor.PlayerProfileManager and LevelController are just some game classes that you will know later.@Override
public Engine onLoadEngine() {
...
levelController.mCameraWidth = 460;
levelController.mCameraHeight = 320;
camera = new Camera(0, 0, levelController.mCameraWidth,
levelController.mCameraHeight);
return new Engine(new EngineOptions(true, ScreenOrientation.LANDSCAPE,
new RatioResolutionPolicy(levelController.mCameraWidth,
levelController.mCameraHeight), camera).setNeedsSound(true));
}
Method
onLoadEngine creates a new game engine. First, we need to create Camera for declaring the screen resolution. An important and very useful thing is that Camera resolution isn't connected with mobile phone resolution. That will save you really a lot of work with graphics positions! For example, we declared screen resolution 460x320. You don't need to take care about mobile phone resolution, because you will always use AndEngine resolution (460x320) and AndEngine will automatically recalculate AndEngine resolution to real mobile phone resolution. The next step is to create new Engine. You just need to declare screen orientation (landscape or portrait), screen resolution and custom options. We used only one custom option, for enabling sound.public Scene newGameLevelScene(int levelId){
Scene scene = new Scene(2);
this.mPhysicsWorld = new FixedStepPhysicsWorld(60, new Vector2(0, 0), false);
levelController.setScene(scene);
levelController.setmPhysicsWorld(mPhysicsWorld);
levelController.createFrame();
levelController.loadLevel(levelId);
this.enableAccelerometerSensor(this);
scene.registerUpdateHandler(this.mPhysicsWorld);
return scene;
}
Here, you can see four very important things. First, we need to create a new display
Scene andFixedStepPhysicWorld. FixedStepPhysicWorld is a 2D simulation of real world physic model. It's used for calculating gravity, collision detection... Let's focus on PhysicWorld. It takes three parameters. The first one is frames per seconds (how many times per second should screen be refreshed), the second is gravity vector and third is just if we want to allow PhysicWorld sleeping. enableAccelerometerSensor andregisterUpdateHandler.@Override
public void onAccelerometerChanged(AccelerometerData pAccelerometerData) {
this.mGravityX = pAccelerometerData.getY() * 2;
this.mGravityY = pAccelerometerData.getX() * 2;
if(this.mGravityX > con)
this.mGravityX = con;
if(this.mGravityY > con)
this.mGravityY = con;
if(this.mGravityX < con * (-1))
this.mGravityX = con * (-1);
if(this.mGravityY < con * (-1))
this.mGravityY = con * (-1);
this.mTempVector.set(this.mGravityX, this.mGravityY);
this.mPhysicsWorld.setGravity(this.mTempVector);
}
In method
newGameScene, we enabled accelometerSensor that controls method onAccelerometerChanged. This method is called whenever accelerometer is changed.protected Scene createQuitScene() {
Scene scene = new Scene(2);
scene.setBackground(this.mMenuBackground);
Sprite buttonLevel = new Sprite(100, 100, 250, 70, this.mMenuOkTextureRegion)
{
@Override
public boolean onAreaTouched
(TouchEvent pSceneTouchEvent,float pTouchAreaLocalX,
float pTouchAreaLocalY)
{
if(checkTouchTime())
GameLogicController.getInstance().finish();
return true;
}
};
scene.registerTouchArea(buttonLevel);
scene.getTopLayer().addEntity(buttonLevel);
...
}
Sprite is just graphic on the scene. Much more interesting is the method onAreaTouched. It is callback and whenever someone will press on the button (sprite), this method will be called. Don't forget to register touch area (registerTouchArea) and to add button (addEntity) to the scene!
We just finished with the
main class, so we can move to the LevelController class.public class LevelController {
private ArrayList<Shape> enemyList;
private ArrayList<Shape> goodsList;
private ArrayList<Shape> endPointList;
...
public void createPlayer(TiledTextureRegion mCircleFaceTextureRegion, int x, int y){
//mPlayer = new Player(x, y, mCameraHeight/10,mCameraHeight/10,
mCircleFaceTextureRegion, this);
mPlayer = new Player(x, y, 30,30,mCircleFaceTextureRegion, this);
FixtureDef FIXTURE = PhysicsFactory.createFixtureDef(1, 0.5f, 0.5f);
Body body;
body = PhysicsFactory.createCircleBody(mPhysicsWorld, mPlayer,
BodyType.DynamicBody, FIXTURE);
mPhysicsWorld.registerPhysicsConnector(new PhysicsConnector
(mPlayer, body, true, true, false, false));
scene.getTopLayer().addEntity(mPlayer);
}
...
}
LevelController class is responsible for loading levels and controlling level events. Arraylists enemyList,goodsList and endPointList are used for storing enemy balls, goods (diamonds) and end points (finish line). Method createPlayer creates a new player on position x,y with size 30x30, PhysicFactory.CreateFixtureDefcreates a new physical object. Physical object should be registered to mPhysicsWorld for collision detection.public void callbackCollisionGoods(int i){
Shape goodShape = goodsList.get(i);
scene.getBottomLayer().removeEntity(goodShape);
goodsList.remove(i);
}
If player collects diamond,
callbackCollisionGoods is called. In this method, we remove diamond fromgoodsList and goodShape from scene.
Other methods in this class are very similar and I won't describe them in detail.
The next class is
PlayerProfileManager. In this class, you will find only basic Java code except methodWriteSettings.private void WriteSettings() {
String FILENAME = "settings2";
FileOutputStream fos = null;
DataOutputStream dos;
try {
fos = gameLogicController.openFileOutput(FILENAME, Context.MODE_PRIVATE);
} catch (FileNotFoundException e) {
}
try {
dos=new DataOutputStream(fos);
dos.writeInt(unlockedLevelId);
} catch (IOException e) {
}
try {
fos.close();
} catch (IOException e) {
}
}
In method
WriteSettings, we save level information to mobile phone. It's necessary to open, write and close file. Actually, we save only one number - ID of last unlocked level. For example, if level ID is 5, then levels 1, 2, 3, 4 and 5 are unlocked.
The last described class is
Player.public class Player extends AnimatedSprite {
...
@Override
protected void onManagedUpdate(final float pSecondsElapsed) {
super.onManagedUpdate(pSecondsElapsed);
onBeforePositionChanged();
}
private boolean onBeforePositionChanged(){
//speed up
if(frameCount < 2){
frameCount++;
return true;
}
frameCount = 0;
int enemyListSize = levelController.getEnemyList().size();
for(int i = 0; i < enemyListSize; i++)
if(this.collidesWith(levelController.getEnemyList().get(i)))
{
levelController.callbackCollisionEnemy();
return false;
}
for(int i = 0; i < levelController.getGoodsList().size(); i++)
if(this.collidesWith(levelController.getGoodsList().get(i)))
{
levelController.callbackCollisionGoods(i);
return false;
}
for(int i = 0; i < levelController.getEndPointList().size(); i++)
if(this.collidesWith(levelController.getEndPointList().get(i)))
{
levelController.callbackCollisionWithEndPoint();
return false;
}
return true;
}
...
}
Player class is extended AnimatedSprite. The difference between Sprite and AnimatedSprite is just one - animated sprite consists of more pictures (animation) while Sprite consist of one picture. OnManagedUpdate is callback executed every "x" miliseconds. OnBeforePositionChanged checks if player is in collision with enemy, diamond or end point. If it's in collision, then the appropriate callback is executed.
how to add and input admob inside this game to adsense purpose??
ReplyDeleteThanks for Sharing! I want to share Android Wearable Game. Ball Escape is a simple game with simple controls and simple rules. All you need is to save the ball from escaping the screen. Keep it trapped inside the playground to score as high as possible. Get this Wearable Game Here >>>
ReplyDeleteYour web blog system is so cool that I can read your article any number of times. You can check out some really awesome blogs at source code free download source code free download
ReplyDeletePirates Adventure - Free Android Source Code:
ReplyDeletehttps://tinyurl.com/y6vr5wx2
hii
ReplyDeletegood job
War Z : Law of survival
Android Source Code Abc Call Recorder v1.1 - Beautiful UI, Admob, Firebase Push Notification, Admin Panel
ReplyDeleteDownload eVPNv2.1 - Free Ultimate VPN | Beautiful UI, Admob, Push Notification Android Source Code
Download Jungle World Game Source Code- Eclipse & Android Studio - AdMob Ads
Downloader Secret Call Blocker + AdMob Android App + Easy Editing Source Code
Download Android Source Code Instagram Videos And Images Downloader + Admob
link title